DDEV: VS Code integration, edit config end disk cleanup
Now that your DDEV environment is humming along, it’s time to optimize. Local development on Windows with WSL2 is powerful, but it requires knowing a few “under-the-hood” tricks to keep things fast and clean.
1. Precision Editing with Nano
Sometimes you need to tweak the DDEV global settings (like changing ports or default behavior). While you could open these files with a Windows editor, you risk messing up the line endings (LF vs CRLF), which Linux hates.
The safest way is to use Nano, the built-in Linux text editor.
How to edit global_config.yaml:
- Open your Ubuntu terminal.
- Type:
nano ~/.ddev/global_config.yaml - Navigation: Use the arrow keys to move around. There is no mouse support here!
- Editing: Just start typing. To delete, use Backspace or Delete.
- Saving: Press
Ctrl + O(Write Out), then hit Enter to confirm the filename. - Exiting: Press
Ctrl + X.
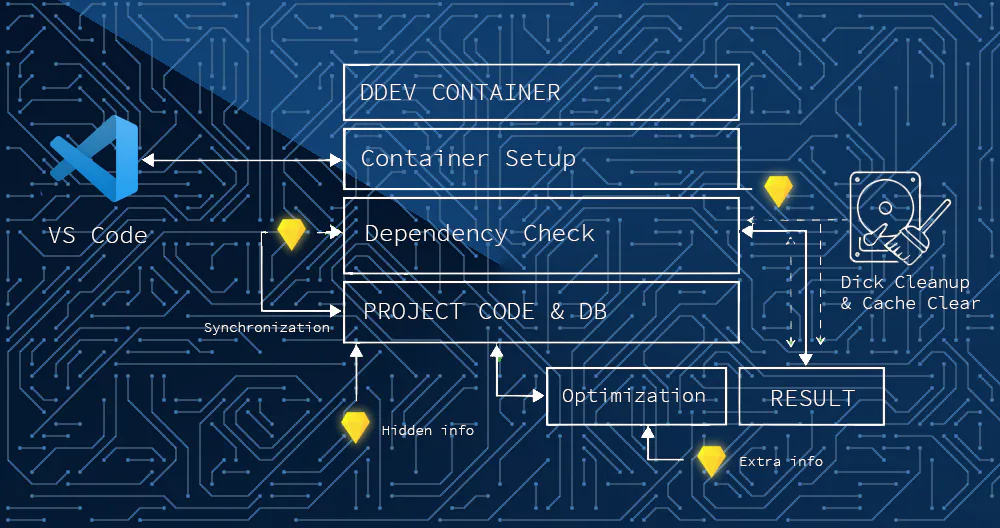
2. The “Spring Cleaning” Protocol (Recovering GBs of Space)
Deleting a folder in Windows doesn’t always give you your disk space back because WSL2 uses a virtual disk that expands but rarely shrinks. Use this “Definitive Cleanup” when you finish a large project:
- Inside Ubuntu:
- Remove the DDEV metadata:
ddev delete --omit-snapshot - Delete the files:
rm -rf ~/websites/projectname
- Remove the DDEV metadata:
- Close Everything: Exit VS Code and close all terminal windows.
- On Windows (The Compactor):
- If you have a
pulisci_wsl.batfile (a script that runswsl --shutdownand thediskpartcompact command), right-click it and choose “Run as Administrator”. - Note: Only do this after deleting large projects, as restarting the WSL subsystem takes a couple of minutes.
- If you have a
3. VS Code: The “Remote” Reality
Bridging the Gap: Connecting VS Code to WSL
To work effectively, VS Code needs to do more than just open files; it needs to “teleport” itself inside the Linux environment. This is where the magic happens.
1. The Gateway: The WSL Extension
Before doing anything else, you must install the official WSL extension by Microsoft from the VS Code Marketplace. This is the bridge that allows Windows to talk to your Ubuntu distribution seamlessly.
2. Entering the Remote Realm
Once the extension is installed, look at the very bottom-left corner of your VS Code window. You will see a small, green (or blue) icon that looks like two brackets ><.
- Click the Icon: A tooltip saying “Open a Remote Window” will appear.
- Select “Connect to WSL”: A dropdown menu will open at the top of your screen. Choose “Connect to WSL” (or “Connect to WSL using Distro” if you have multiple setups).
3. A New Interface: The Two Faces of VS Code
After you connect, VS Code restarts, and the interface evolves. You are no longer in a Windows program; you are operating “inside” Linux.
- The Status Bar: The bottom-left corner now proudly displays WSL: Ubuntu.
- The Extensions Sidebar: This is where beginners often get lost. When you open the Extensions view (
Ctrl+Shift+X), you will now see two distinct sections:- Local – Installed: Extensions running on your Windows machine.
- WSL: UBUNTU – Installed: Extensions running inside your Linux environment.
Crucial Step: For tools like PHP Intelephense or Laravel Extra Intellisense to work, they must be installed in the “WSL: Ubuntu” section. If you see a blue button saying “Install in WSL,” click it. This allows the extension to “see” the PHP binary and the files living inside your DDEV containers.
4. Opening your Project
Now that the bridge is active, here is how to get to work:
- From the Terminal (Recommended): In your Ubuntu terminal, navigate to your project folder and simply type:
code . - The Result: VS Code will open that folder immediately within the WSL context, with all your Linux-based tools ready to go.
4. Troubleshooting VS Code & Laravel
“PHP Executable Not Found”
If Intelephense complains it can’t find PHP, remember: PHP lives inside the DDEV container, not on Windows or even directly in Ubuntu.
- The Fix: Usually, installing the PHP extension specifically inside the WSL remote session resolves this, as it will look for the Ubuntu PHP (if installed) or you can point it to the DDEV binary path (usually
/usr/bin/php).
Laravel Extra Intellisense: “PHP: Permission Denied”
If you see a wall of errors like /bin/sh: 1: php: Permission denied while using Laravel, don’t panic. This happens because the extension is trying to run PHP commands locally in Ubuntu, but your environment is inside DDEV.
How to fix it: You need to tell the extension to “talk” to DDEV instead of a local PHP. Go to VS Code Settings, search for Laravel Extra Intellisense: Php Command, and change the default to: ddev php -r "{code}"
This forces the extension to execute its logic inside the DDEV container where PHP has the correct permissions and access to your database.
Leave a Reply